Showing posts with label gifts. Show all posts

Monday, June 14, 2010

Resurfacing!

Wow - I can't believe it's been OVER A YEAR since I posted anything here!
I suppose that's mostly because I haven't worked on a lot of stuff, so there hasn't been much to post. Seems my creative bug took a major backseat. It rears it's little head every now and then, but doesn't seem to stay around for long.

I REALLY want to be crafting more. And I really want to be blogging more. I'm going to try...we'll see how it goes.

My dear sweet cousin got married in May and she asked if I could make some stationary sets for her bridesmaids. So I did...and I had fun making them. I did sets of monogrammed cards, beaded pens and magnets. This was my first try at the magnets. They didn't turn out perfect, but I liked them enough that I'll try them again and see if I can do even better.

Here is one of the sets I made:


Her wedding colors were ivory and peridot green, with pink as an accent. I could not figure out a way to work the pink in that made me happy, so I just didn't include it.
I created the monograms in Word and printed them out. I really like the way they turned out.
they each got a set of 8 cards and a matching beaded pen.

I had these great little acrylic boxes they fit perfectly in. Here's a view from the side:


And of course, I couldn't give these to her without having created a set for the bride as well! I had run out of the green paper, so I went more neutral with hers and used brown.


And then I made the magnets using the glass pebbles. Each girl received 4 magnets - 2 with their first initial, and 2 with patterned paper.


I used small round tins to put the magnets in, decorated with the same paper. But I forgot to take a picture of them.

Soo...now that I've posted, I will do my best not to let another year go by before I post something else! LOL!

Friday, January 11, 2008

I Hope My Computer Doesn't Explode

It just might because of what I'm about to post.

Let me explain.....My husband is a DIE HARD Georgia Tech Yellow Jackets fan. He's also a fan of any team who plays AGAINST the Georgia Bulldogs.

I'm talking serious stuff.

However, we do have friends and even some family who are fans of the Dawg. We love them in spite of it.

What's this got to do with anything?

Well, as I posted earlier, I made monogram cards for friends and family. For our family, I make these for the couples and single adults. For years, I've done one gift for this group and a different gift for the "younger" crowd who might not appreciate such a "grown up" gift.

Chip's (my hubby)cousin Nathan is a UGA graduate. Up until last Christmas, I still grouped him with the "younger" crowd. His younger sister had already moved into the "adult" crowd because she got married.

Last Christmas he made the comment, "When do I get to graduate to the adult gifts?" I felt stupid! It's not that I didn't consider him and adult, but that he's well, a guy and all, and I didn't figure he'd appreciate the gift I had made for the "adult" crowd!

So this Christmas, he "graduated". However, I still felt the cards I made were a little on the "frilly" side for him. So I made him a special set.

All that to show you this:


I knew my husband would eventually find out I had tainted our house with this image. I didn't know how he'd take it. He caught a glimpse of these on my screen recently and wanted to know what they were doing there and who they were for. He was very forgiving...considering! But he did make the comment that my computer was now probably going to explode. I hope not!

Oh, and I'm pretty happy with the way these came out. I found the image online and printed it on cardstock and then used a circle punch to punch them out. I had planned to use my multi-letter stamp for the words. But I didn't like how far spaced apart it was, and I was having trouble stamping evenly. If I had not already assembled the cards, I would have run them through my printer and printed it directly on the cards. But it was too late for that, so I just printed it on the red cardstock, cut it out and adhered. Not exactly the way I had it pictured in my head, but it works.

Monday, January 07, 2008

My Favorite Gift

OK, so now I will post the gift I had the most fun making this year. It is actually a set of things. I forgot to take a picture of them all together, so I will have to post each picture seperately.

My Mom is in the process of redoing her kitchen with the Italian Chef theme. I knew exactly what I wanted to do.

I got these ideas from all the wonderfully talented ladies at SplitCoast Stampers.

First up: Recipe Tin


I love how this turned out. I was trying to match the colors in her kitchen. When she opened it, that was one of the first things she said was that the colors matched! I included dividers inside and a bunch of my favorite recipes. I still have more to add to her collection, but I ran out of time before Christmas!

Next: Coasters


I'm really happy with the way these came out too. I used the unglazed tumbled tiles. Then I colored them in with sharpies. I tested these, and they didn't leave a water ring, but if I spilled something like coke or coffee on them, they stained. So I sprayed them with a sealer to prevent that. I used thin sheets of cork, cut to size on the bottom of them.

Refrigerator magnet/post it note holder & beaded pen.


I used one of the acrylic frames and turned it around so the "foot" was in the front. Then I adhered magnets to the back (front!) I did this so it would hang on the refrigerator and have a little shelf for the pen. It is pictured hanging on my fridge.

Dry Erase Tile:


I used one of the ceramic tiles for this. What makes it so easy, is if you mess up, you can wipe it right off and try again. After stamping the image, I heat set it with my heat tool. Then I colored in with sharpies and heat set again. I read on SCS that to keep this image "in place" that they covered it with Crystal Effects. I didn't have any but I had some Liquid Embossing by All Night Media, and from what I can tell, it does the same thing. So I used it, and it worked perfectly.

And Next: Menu Board


I picked up this little chalkboard at Michaels. I painted the edges to match everything else. Then I stamped right on it. The image was a little too faint for my liking, so I outlined it with a silver sharpie. It made the image not be quite as crisp, but it still works. Then I attached a piece of ribbon tied to a stick of chalk. (Hey Mom, I forgot to give you the box of chalk! I'll bring it next week!)

And lastly. A Birthday Card
Her birthday was a week before Christmas. I have to admit, I pretty much copied this card exactly from a SCS'r. You can see her original card here. I just loved it so much and knew it was the perfect card.


And there are actually a couple more things that were supposed to go with this set, but time just got the best of me, and I ran out of it! So once she has the other things, I'll post them here too.

This was absolutely the gift I enjoyed making the most. I couldn't wait for her to get it. And she loved it. At least, I'm pretty sure she did. After all, she is my Mom, and she'd NEVER tell me if she didn't like something. But I can read her pretty well, and she really did seem to love it!

And hey Mom - I LOVE YOU!!!

Saturday, January 05, 2008

Monogrammed Cards

More Christmas Gifts...

I made sets of 5 monogrammed cards for some gifts. I kept them simple since I was doing a lot of them.

I used various black/white/grey patterned papers for the strip in the middle, varying them so that each set had 5 different patterns. Then I used my scallop punch for the black cardstock. I stamped the design and letter in the middle of the white cardstock and assembled. The stamps are from Oriental Trading.


I made 36 set of these. Yep - 180 cards. I did them in an assembly line fashion, so it wasn't that difficult. Here's one big batch - I still had more after these.


Coming up next - the gift I had the most fun making!

Friday, January 04, 2008

For Baby

More Christmas gifts...these for 2 brand new babies in the family. Two of my cousins had babies - one right before Thanksgiving and the other right before Christmas. The brand new one was just a few days old when we all got together Christmas Eve. Such sweetness!

Anyway, since I couldn't go to the showers, I gave them their gifts at Christmas. Here are the things I made:

The first is for my darling cousin Lindsey, who actually lived with us for a year when she was 12 (and now she's a mommy!!!)(and I remember when she was born....I'm getting old!) Anyway, I found out she was doing baby Landon's room in a cute jungle animal theme. So I made this frame for his room with the cute little lion I got from Michael's.


And when I saw this adorable fleece, I couldn't resist getting it to make another now-sew blanket.


And my cousin Davie (Lindsey's brother) and his girlfriend Alison had a baby girl. Unfortunately, I didn't know her name when I was making her gift, so I just made a first Christmas frame.


And then these cute little onesies. The pictures aren't as clear a I wish, but you get the idea.

So Very Loved


Sweet


I used Stampin Up's So Very and Big Flower sets and stamped these with fabric paint. I think they turned out pretty cute.
I also gave her a couple of sweet baby outfits, but I didn't do anything to them, so no pics, lol!

More coming soon!

Wednesday, January 02, 2008

Here We Go...

OK, I'm falling crawling out from under the pile I was getting burried under! And now I can get some of the projects posted of things I made for Christmas. I'll try to get them all on here over the next few days.

For starters, here is a set I made for my MIL.

On the left is a magnet photo frame I altered to a post it note holder, complete with a pic of the kids. In the middle is a photo book I altered (and filled with pics of the kids) and a beaded pen. And lastly is an altered journal and a bookmark.

Here is what the journal looked like before:


And here's a closeup of the after.

I'm kind of wishing I had cut the scalloped circle out of white so it would have stood out a little more. But it stands out a little more in person than it does in the photo.

Lots more to come, but at least I have a start on it now!

Sunday, December 23, 2007

More Hershey Tins

I really love how quick and easy these are - not to mention yummy!
I made a few more, but I didn't take pictures of them all - since they basically look the same.

I really liked the candy cane tin and wish I had picked up more of these. I didn't really have any stamps small enough to use. So I found a candy cane graphic and printed it on the labels. I like the way they came out.


Then I had a very special one to make. I have a dear sweet cousin who ADORES Elvis. I mean, he's been singing Elvis songs for as long as I can remember. (He and I are the same age.) So I made a special Elvis tin for him, using some photos I found online.
I was telling my Mom about this and she informed me that he was diabetic, so I needed a new plan. Unfortunately, I couldn't find any sugar-free candy in the right shape to hold the labels nicely. So I just did the best I could and wrapped the chocolates I found with the labels. It may not look quite as nice as the nuggets, but I'm sure he will like it.


I've been so busy making things that I haven't had much time for blogging. But once Christmas is over, I'll be sharing more of the things I made.

I hope you all have a Very Merry Christmas!!!

Wednesday, December 19, 2007

A Couple of Holders

Here's a couple of holder-type things I made. The first is a chap stick/lip balm holder. I saw these on SCS and thought they were so cute. And the ladies there are so wonderful at posting directions and template for so many different projects. I am very thankful for that!

I made these for a couple of the teenage girls in the family in which I needed just a little gift. I may be making a few more of these.

This shows the inside and the outside.


And then I found the M&M Christmas Story on SCS as well. I really liked it and since I had a couple bags of Christmas M&M's I decided to do something with them. I needed a little treat to send with CJ for his Friday Science class. I used small bags to put the M&M's in, so making a topper with this poem was a bit too big.
So I printed it out, scored it in a couple places and make a little tent to hold the M&M's. I had seen things like this done all over the place and it was easy enough to adapt to be the right size.

These two go along with the chap sticks above. I made more for CJ's class, but they were in green. I didn't think to take a picture of them, but other than the color, they were exactly like these.


I'm trying to take pictures of everything I'm making as I go along. I'm just slow getting them posted because I've been so busy! And some of them I won't be able to post until after Christmas anyway.

I'll be so glad when I'm all done! But I'm having fun!

Saturday, December 15, 2007

My First Nugget Tin!

I've been seeing these for a while now and have been wanting to make one. I saw a cute one on Wanda's blog where she used a gift card tin from Michaels. I had been looking in all the wrong places for one. Then she posted a message and told where to find them. Right up at the registers! They had been right in my face the whole time!

She used an adorable snowman tin, I really wanted one like that, so I searched every register. But to no avail. So I picked up this one and a candy cane one. The picture of the candy cane one is still on my camera. I will post it later.

Using these tins couldn't be easier, because you really don't need to do anything to them! And with using labels to go on the Hershey's Nuggets is so easy - and fun!

So here's my first one.

Then I just made a band using cardstock, to go around it and hold it together. It slides right off.

I see many more of these in my future, as they can be used for any occasion! And these Christmas tins? I plan to check Michaels right after Christmas and hope to find them marked down so I can stock up for next year!

Friday, December 14, 2007

A Couple Quick Gifts

I was trying to come up with a gift for my Granddad. He doesn't need anything, doesn't really use most of the stuff he gets, and is just generally a tougher one to get something for.

So this is what I came up with - simple, funtional, and with the pic of two of his great-grandkids, it's cute too!


I used a 5x7 acrylic frame. And I found the calendar at Split Coast Stampers. I think he will really like this.

My husband really liked it and had a great idea. He suggested I make one for his Dad to go in his truck. He drives a big lumber truck all day, and he keeps a calendar up on his dash. So hubby suggested I just add a velcro strip to the bottom, so he could put this there. What a smart man I married!

I made this one in the 4x6 size so it would sit on his dash better. I know without a doubt he's going to like this!

Tuesday, November 13, 2007

Thanks, Coach

CJ played for Upward Basketball at our church again this year. Tonight is the awards ceremony. (We play our season early so the school can have the gym during actual basketball season.)

I've been trying to come up with something to make as a thank you gift. I made this today. (Did I mention the ceremony is tonight? Nothing like waiting until the last minute!)

I was having trouble because I wanted something fitting for a male coach. And then today, when I was looking at the team picture I realized I needed to make it for the coach and his wife! I have NO IDEA why I had not even considered that before - duh!

Anyway, I still didn't want any thing froo-froo, so this is what I came up with.


I scanned the team photo and reduced it to fit on the post-it-note holder. (Yes, they were a VERY small team - we didn't have many middle-schoolers playing this year.)

For the pen, I was going to just do the one where you slide the paper down into the barrel of the pen - I but I didn't have any of the right pens on hand. And since the gift was now for both of them, I decided the beaded pen would work just fine.

I have a bunch of these little tins left over from Christmas last year and haven't done anything with them. This one will be filled with candy - probably Hersey's Miniatures - which I will be picking up on the way to the ceremony tonight!

And the card - super quick and easy. I really didn't want white lettering, but had limited options since I couldn't find any lighter coordinating cardstock that would match. I guess it turned out ok though.

Anyway, I hope they like it!

Saturday, November 03, 2007

A Little Something Different

OK, so up till now, most of the things I have created have been paper-related for the most part.

But I decided to try something new.

I wanted to make a blanket for my daughter.

I don't sew.

Well, not much anyway. I will occasionally sew a button or stitch something up that has come unstitched. But I don't really enjoy it.

Once upon a time I could use a sewing machine and do a pretty good job. I made a really pretty skirt and a petticoat to go under it. That was ages ago. But I did learn how to use a machine.

A couple years ago, I purchased (for almost nothing) an almost new sewing machine from a friend of mine who was having a yard sale.

It has been sitting in the closet since then.

I did get it out a couple months ago and tried to use it to do some sewing on some cards and layouts. But I couldn't get the darn thing to work right.

And the other day my neighbor (who sews a lot) looked at it and fiddled with it, and thought it was working ok. But alas, it's not.

So how does one make a blanket without sewing? Well, I'm sure you've seen these, but when I found this tutorial on Barb's blog, I just knew I had to try it!

I goofed up just a bit. I decided I wanted mine rectangle instead of square like Barb's. So I figured out my measurements. I did great on the length, but with the width, well...I figured out who wide I wanted it but forgot to include the measurement for the fringe. So I cut it to narrow.

That's why I wanted my machine to work. I was just going to stitch the long sides and have fringe only on the ends. But I couldn't get it to work properly.

So I just made the fringe on the sides a little shorter than on the ends.

It is more narrow than I really wanted, but in the end it all worked out fine. It fits Ruthi and her bed perfectly. So I'm happy.

When I saw this Pink Georgia Tech Fleece, I could NOT pass it up. Ruthi always cheers for the Jackets when her daddy is watching football. (Even if they are not playing) And she makes a really cute cheerleader!

Here's the blanket:


And if you will notice, there is a little pillow there too. I used a little princess pillow that Ruthi has had since birth, but was falling apart. I just cut the fleece to the right size and put the old pillow in between and tied around the sides. I didn't have a piece of the GT fleece leftover that was large enough to fit and be centered, so I used the solid pink (which is also on the back side of the blanket). Then I hand stitched that GT square on. (See, I am at least capable of sewing!) It didn't go on perfectly straight, but I will not let my OCD get he best of me!

Oh, and since I goofed an my strips were shorter on the sides, I couldn't loop them - I had to the pieces together into knots. But I'm happy with it.

And here's a picture of my little darling with her new blanket.


I'm pretty sure she likes it. She says, "Mommy, it's so pretty and sosht." (soft) Makes me smile!

Monday, May 21, 2007

Wedding Gifts

I was so upset, I wasn't able to make it to Amber (Chip's cousin)and Matt's wedding. I imagine it was absolutely beautiful, and I wanted to be there so much! But my back has been out for over a week now, and even though the chiropractic adjustments are helping, I'm still in a good bit of pain. Since Chip had to work, I would have had to make the drive myself, and it was over an hour away. I just didn't feel I could do it and then have Ruthi hanging off me and keep a smile on my face. I just wouldn't have been able to enjoy myself and would have probably been in even more pain on the way home. I hate that I had to miss it, but I did have to do what was best for me. (Wow - that sounded kinda selfish - but you know what I mean!)

Anyway, I made their wedding gift, and didn't want to wait till who knows when to give it to them, so the cousin who lives down the road from me took it for me. (Thank you Cathy!!)

With limited funds for a gift, I decided to make something. Sure, I could have spent the little bit that it cost me to buy the frame and supplies (which wasn't much, because I had most of it on hand) and bought something from their registry, but it would have been such a small 'something', that it actually made me feel cheap! Of course there was Chip's argument that people register for things they want/need and probably look forward to getting those things. I know this is true (I loved getting things from my wedding and baby registries), but I also know how much I cherish the things that were hand made or personalized, and things that were unexpected. So, I am hoping that they will like and appreciate what I made. So here it is:

I made a name frame that they can put at their front door (or anywhere they like for that matter.)


I had checked out their registry, and from what I could tell, they had a lot of neutral colored things picked out. That is why I decided to go with the browns/neutrals. It doesn't show up well in the photo, but the little heart above the name has "The" written in it.
I didn't have any stamps large enough to stamp the letters, so I printed the letters onto cardstock from MSWord and cut them out with a craft knife to make a template, in which I chalked in the color. The little square underneath says "est. 2007" using rub-on letters from TLC. The metal charms I had on hand, and everything else came from Michael's.
I wish I had taken the photo without the glass so there wouldn't be a glare, but I didn't, so oh well! This is the first name frame I've made, and I'm pretty pleased with how it came out. I plan to make one for myself now! I really do hope they like it.

**(Edited to add: You can click to see the picture larger. When I did this, I noticed that the little rhinestones in the heart appear to be colored. They are not - that is just the way the light is reflecting off them. And goodness, you can see my hands and my computer screen in the glass - LOL!)

I also made a set of 10 monogrammed note cards. I was going to make them Thank You cards, but decided against that so they can be used for other reasons as well. I used the same papers/colors as I did for the wedding card, pulling from the colors of their wedding. I know that she was going to have lavender, and I'm not sure if this is the shade, but since it doesn't have to match the wedding, I figured it didn't matter that much.


The 'N' and the little flourish in the corner are embossed with silver Super Fine Detail embossing powder by Ranger. (I love this stuff!) And though I didn't take a picture, I dressed the envelopes up just a little by stamping the same flourish on the front in the bottom left corner, and stamped an "N" on the back flap. I made a band from the black cardstock and layered a thinner band in the purple on top of that, and wrapped it around the set. Then I tied it with the same ribbon. And of course, I didn't get a picture of that either! But I hope they like these as well.

I think I've already set my all-time high for making cards this month, as I've already made over 40, and I still need to make a few more! Phew! Maybe in June I'll get to sleep again! (Yes, late at night is when I work best and get most of this stuff done - with no interruptions!)

Saturday, May 19, 2007

Mother's Day Cards

This is the card I ended making for my Mom for Mother's day. I was inspired by many I've seen using the flower for the "O".


I wouldn't typically pick greens for this kind of card, but I started with this flower, and that's just how it turned out. I stamped the background with one of the stamps from the Looks Like Spring set by Stampin Up, using a clear embossing pad, and then embossed it with transparent powder. I used my Fiskars shape cutter for the m's and matted them with white. The ribbon came from Michael's.
I decided to do a long card, because with the size of the flower, it was too crowded to do a smaller one. My Mom really liked it. And, both Mom's really liked their gifts!

I also made for each of them a set of cards and a tote to hold them. I used the "one sheet wonder" (OSW) method, where I used a sheet of patterned paper cut up in different sizes/shapes and used it in different ways on the cards. I kept them all pretty simple.

For the first set I found instructions with measurements for a OSW and used it as a guide. You can see the original here, and the instructions and measurements for the tote and the cards here.


I was also inspired by another SCS'er for this set, but I can't find the link. I thought I had saved it, but apparently I didn't. If I can find it, I will come back and add it.


This second set actually ended up with 10 cards in it, but somehow, one of them didn't make it into the picture. (You can click the pictures to view larger.)

Thursday, May 17, 2007

Magnet Frames and Tissue Boxes

I can finally post the things I made for Mother's Day since both of our Mom's will be receiving them today. (And I don't think my Mom will look here before I see her!) I didn't get to go see my Mom on Mother's Day because I was in too much pain with my back. And Chip had to work, so we knew we wouldn't get to see his either, so we are seeing them both today...finally!

First up, I made these little magnet frames. They are little wooden frames I picked up at Michaels. I painted the edges and then adhered patterned paper. I added a little ribbon and a flower to the one for my MIL, and just some ribbon to my Mom's - I didn't think it needed anything else with that pattern. My mom's kitchen is in an Italian theme, so I thought that paper would be perfect. And I printed the picture in black and white so it wouldn't clash with the paper. I added some magnet tape to the backs of these so they can go on the refrigerator. I actually like these so much that I plan to make one for myself.


I picked up wooden tissue box holders at Michaels too. I covered two sides with patterned paper, and two sides with a solid color. I then attached a picture of the kids on one of the solid sides. I painted the tops to match. Then I sealed the whole thing with a spray sealer. I think these turned out pretty cute and will probably end up making one of these for myself too!

I also made each of them a set of cards, but I will post them later.

Wednesday, April 25, 2007

Frames

I just love making these frames. I've shown the one I made for Baby Hannah. Thought I'd share a couple more. The first one is one I made for Ruthi. It hangs in the hall, just outside her room.


This is one I made for another friend of mine for her baby boy.


I wish I had taken another picture of this one. The colors seem off - the flash washed it out a bit, and I think the blue paper behind it is throwing it off a bit too.

These are wooden frames purchased at Michael's. I painted the edges with acrylic paints, and adhered the paper to the front with spray adhesive. I sanded the paper around the edges to remove the excess. The letters are also from Michael's. I painted them and then used the a pencil eraser to paint the dots. The little wooden accents came from Michael's as well, and I hand painted them. The train was a bit of a challenge for me, because I'm not an artistic painter. I snapped a picture with my cell phone of the example in the store, and used it as a guide.
I stamped the letters in the name with foam stamps and the same acrylic paints. Added some ribbon, and the little jewels for Ruthi's, and done!
These are so much fun, and very inexpensive to make, as the frames are only $1, I think the letters were $1, and the little wooden flower and train are each 25 cents. They can be hung, but also come with a little dowel that goes in the back so they can sit on a shelf or dresser.

I originally saw the idea for these online somewhere, but can't for the life of me remember where!

Monday, April 02, 2007

Lingerie Shower Goodies

I posted the invitations I made for my girlfriend's lingerie shower earlier this month, and finally had the shower this weekend. Now that it's over, I can post the things I made for her.
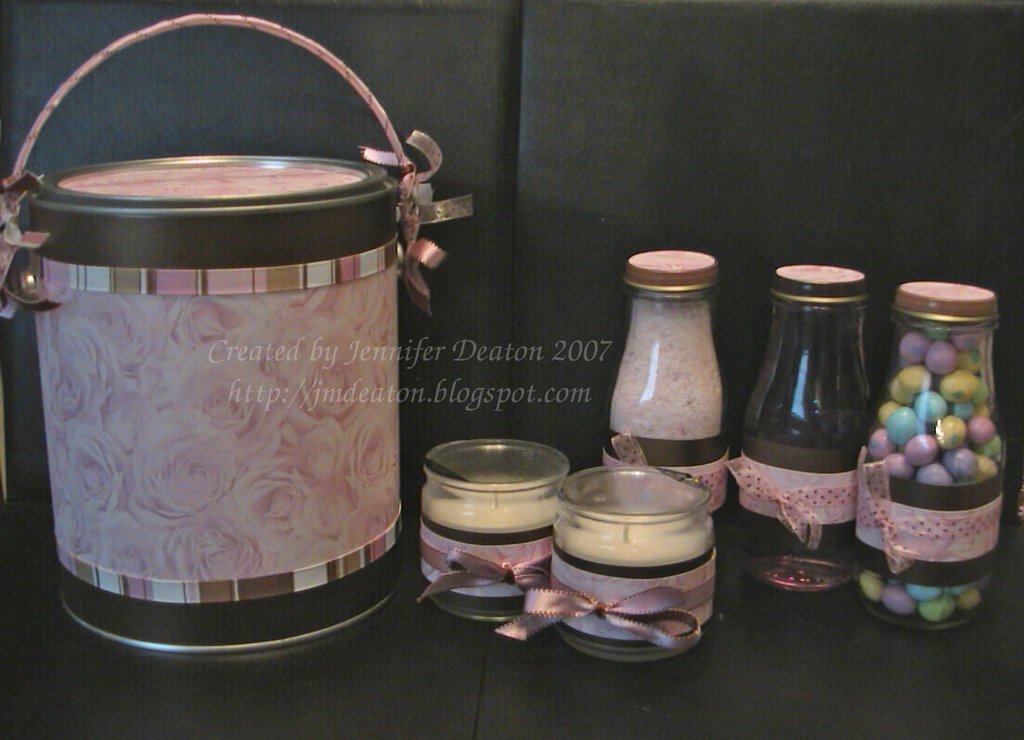
I made a 'honeymoon' paint can filled with goodies for them to take with them. I included 3 frappucino bottles - one with homemade bath salts, one with bath gel and the third with peanut M&M's (her favorite), and two candles, all with the same papers/ribbons I used on the can. I also included some other non-altered things in the can.
I loved the rose patterned paper - not sure who makes it. The solid paper is from The Paper Company and is actually Metallic Jewel Bronze and is much prettier in person. It looks quite bland in the picture. All the ribbons are from Michael's.


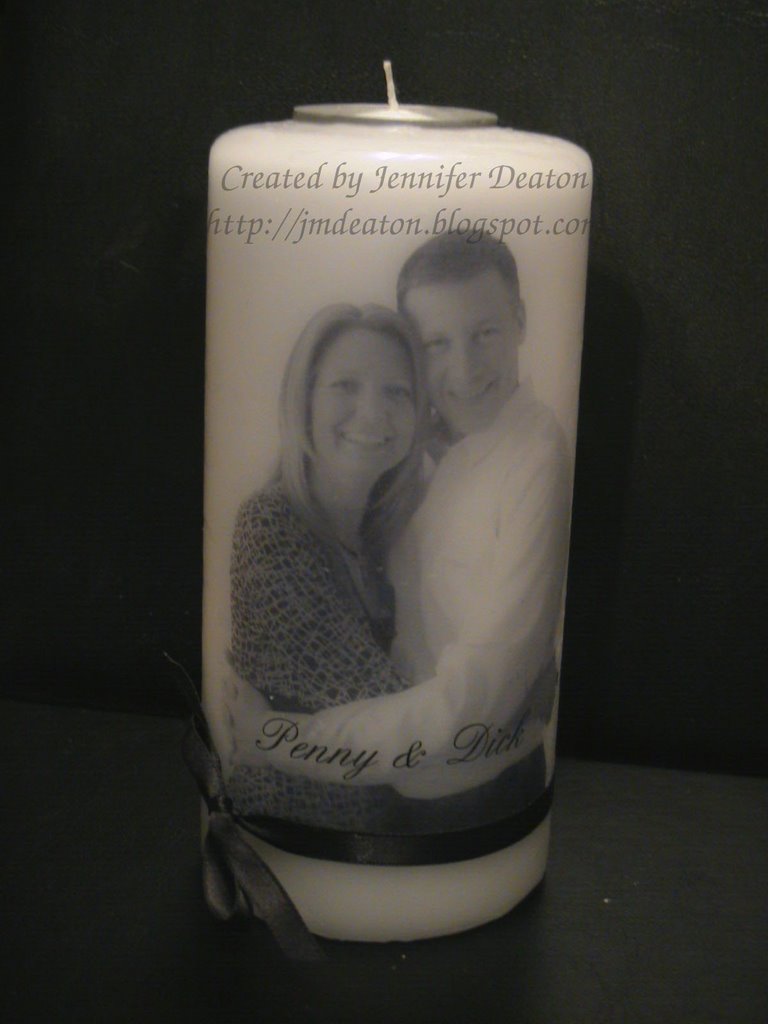
I also made this candle for them. I found a great tutorial on Splitcoast Stampers and couldn't believe how easy this was! I messed up the first time, but quickly learned how to get it just right so I started on a new candle. I really love the way it turned out. I cut out a place in the top to insert a tealight so they can actually use the candle, and just replace the tealight. That idea came from Splitcoast as well.

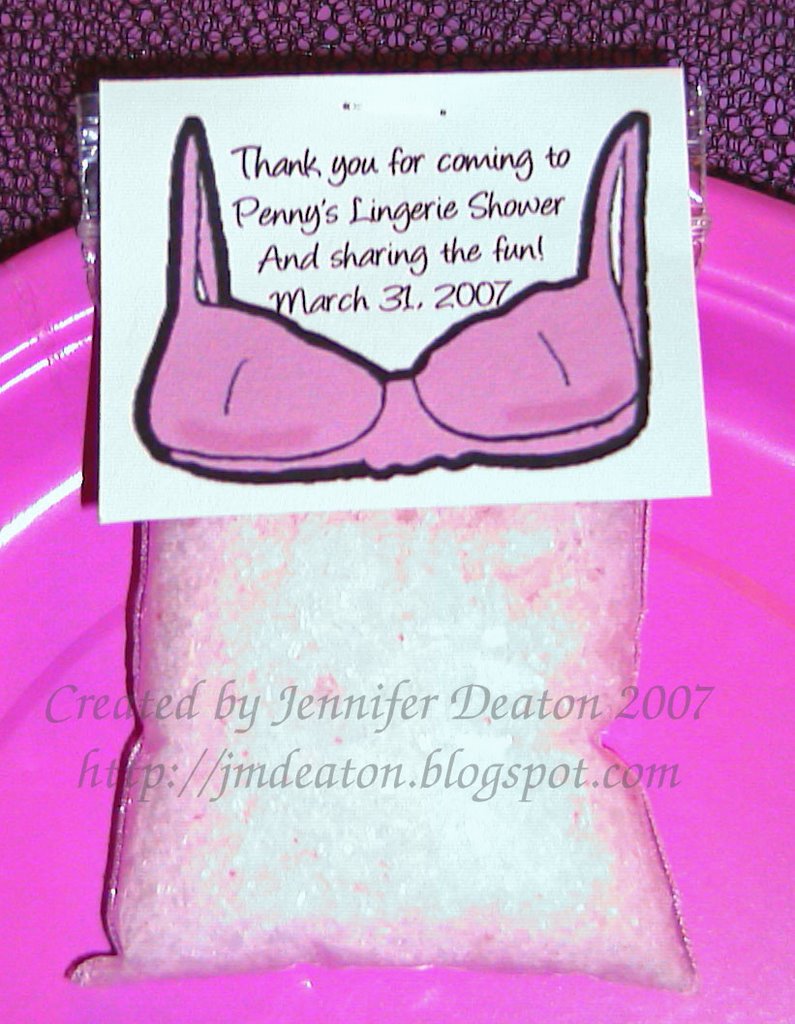
I made these cute little favors for the guest. It is a bag of homemade bath salts. I made the topper using MSWord and just stapled them to the bags.


And this is the cake. It was very yummy if I do say so myself. It was chocolate with cream cheese and raspberry filling. The idea for decorating it came from Family Circle magazine - Sept. 1998 issue. I had this put aside knowing one day I wanted to make it. The chocolate wraps were a bit of a pain to make, and didn't turn out completely perfect, but it worked. I don't think I'll ever do it again due to the fits it gave me! But everyone liked it, and it did taste good!

Friday, February 23, 2007

Baby Shower Gift

I've been busy this past week working on this gift for my friend, Fonda. She is having baby number 5, Hannah, in March. This is a baby who was meant to be here, a true gift from God, as Fonda had a tubal ligation after Emma was born. The doctor freaked out a little, but not Fonda, as she realized this was a miracle. Her tube had actually formed new growth, and we know that was an act of God. And we imagine He must have big plans for this little girl! Fonda is a very special friend. She was in the delivery room when Ruthi was born. She and my other dear friend, Penny were awesome support in bringing Ruthi into this world. Chip and I are very thankful for both of them, and blessed that they and their families are in our lives.
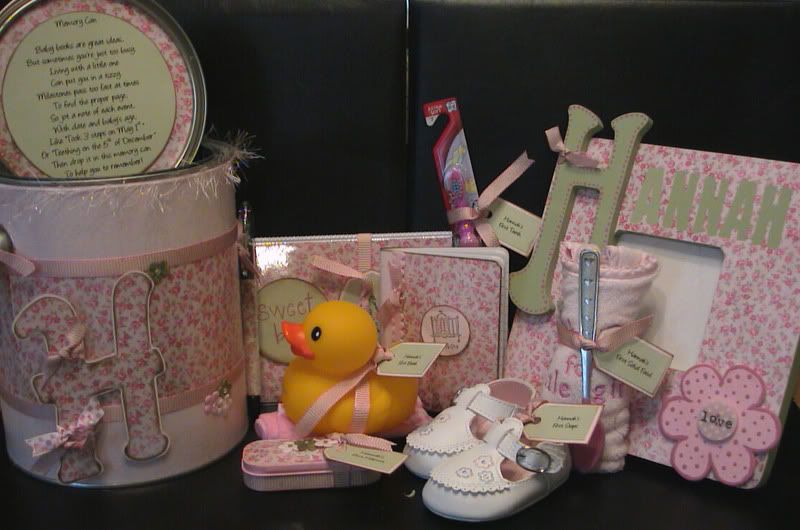
Now, onto the gift. I actually created a scrapbook for Emma's first year, and I loved it, but it was very time consuming. I wanted something just as special, but that wouldn't take quite as long, since it's hard to squeeze in enough time for an entire book. None of these ideas are original, I was inspired from things I had seen online. I may not be great at coming up with the ideas, but I am at re-creating them! This first picture is the grouping of things for baby Hannah.

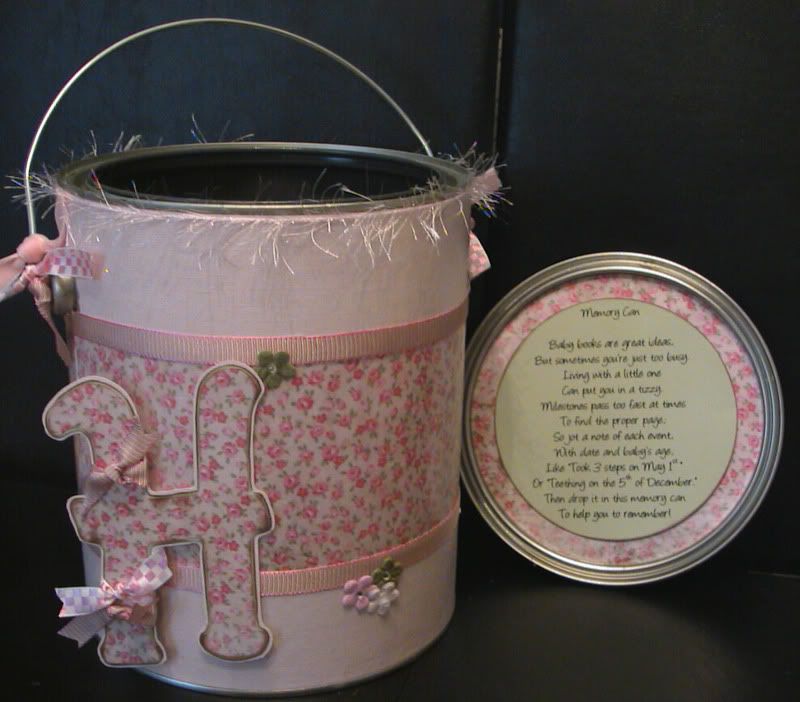
This is a close up of the paint can I altered. I mod podged the paper on, then attached the ribbons and flowers. To get the H, I printed it from MSWord and used it as a pattern.

The poem on the lid reads:
Memory Can
Baby books are great ideas,
But sometimes you're just too busy.
Living with a little one
can put you in a tizzy.
Milestones pass too fast at times
To find the proper page;
So jot a note of each event,
with date and baby's age.
Like "Took 3 steps on May 1st"
or "Teething on the 5th of December."
Then drop it in this memory can
to help you to remember!

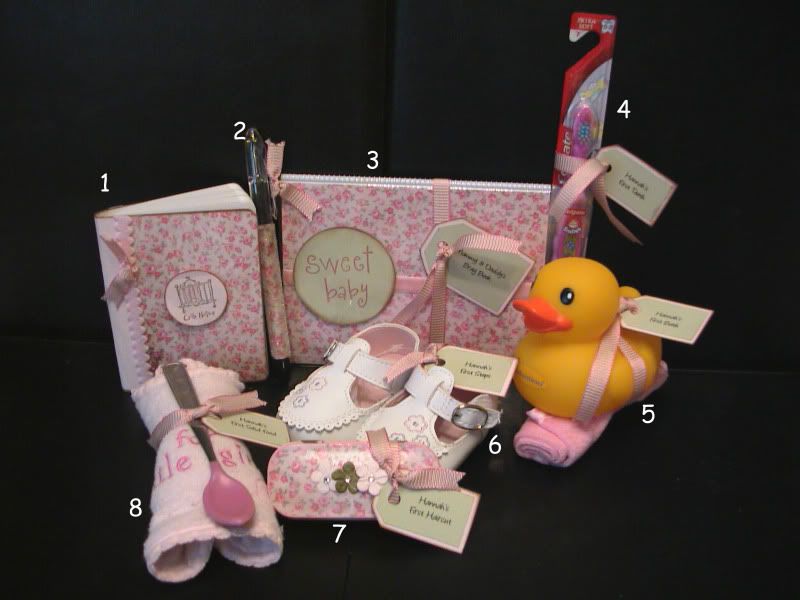
This picture show the things that are included in the memory can. I included little tags for "baby's firsts".


The items are: 1. An altered mini composition book - I stamped the image that is on the front it says 'Crib Notes'. 2. A beaded pen using the same floral paper that is used on the other items. 3. Altered photo album (Mommy & Daddy's brag book) 4. A tooth brush (Hannah's first teeth) 5. Rubber ducky and washcloth (Hannah's first bath) 6. Shoes (Hannah's first steps) 7. An altered Altoid gum tin to hold a lock of hair (Hannah's first haircut) 8. Bib and baby spoon (Hannah's first solid foods).

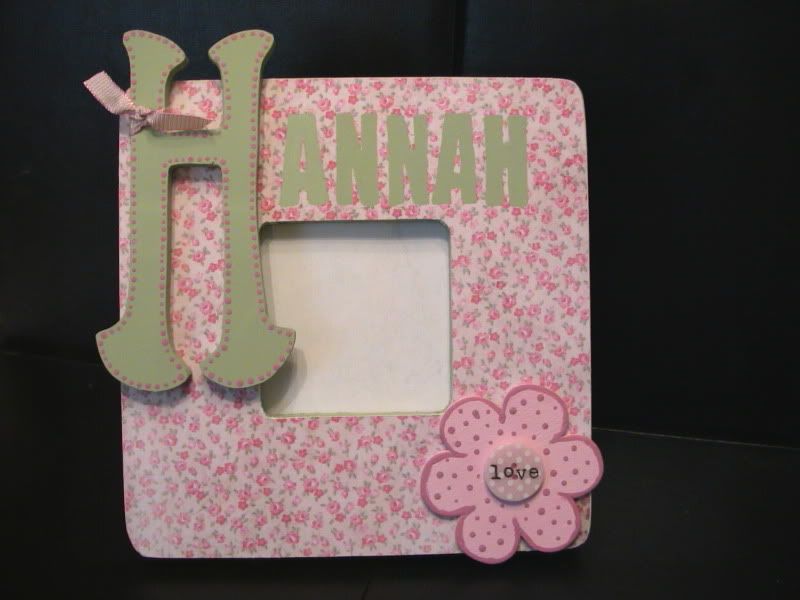
This frame is just a wooden frame from Michael's, I painted the edges and covered the front with paper. I also bought the letter H and the wood flower from Michael's and then hand painted them Then tied just a little ribbon on the H and added the cute button to the flower.


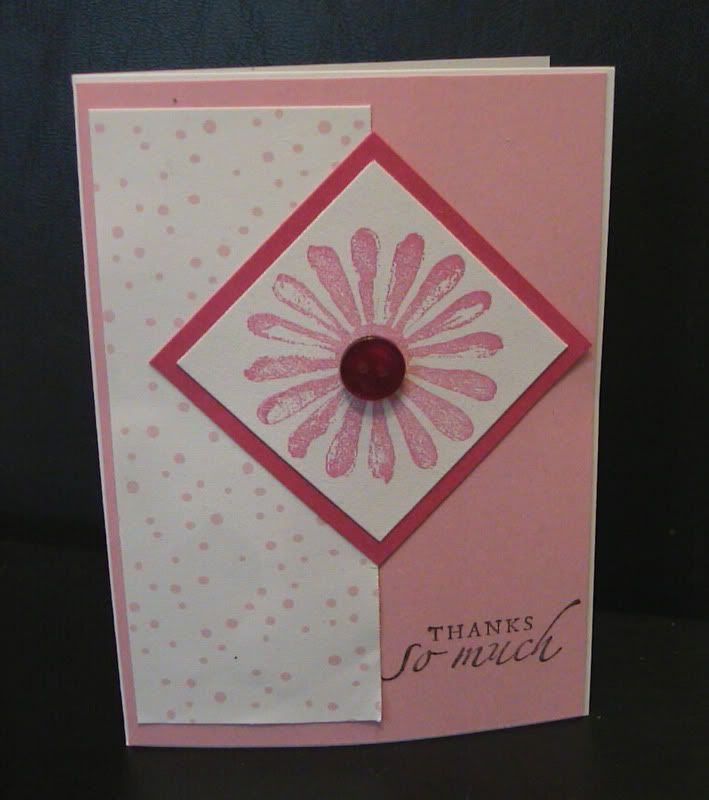
I also included a set of 24 thank you cards. I actually made these before I bought the paper to make the other things, which is why they don't match. I decided to make them pretty general (no baby theme) so that she could use them later if she doesn't need them all. The button in the center of the flower is actually the same color as the darker pink paper, and looks much better in person. It just didn't photograph well. I noticed that the corner of this one is bent - I need to fix that!


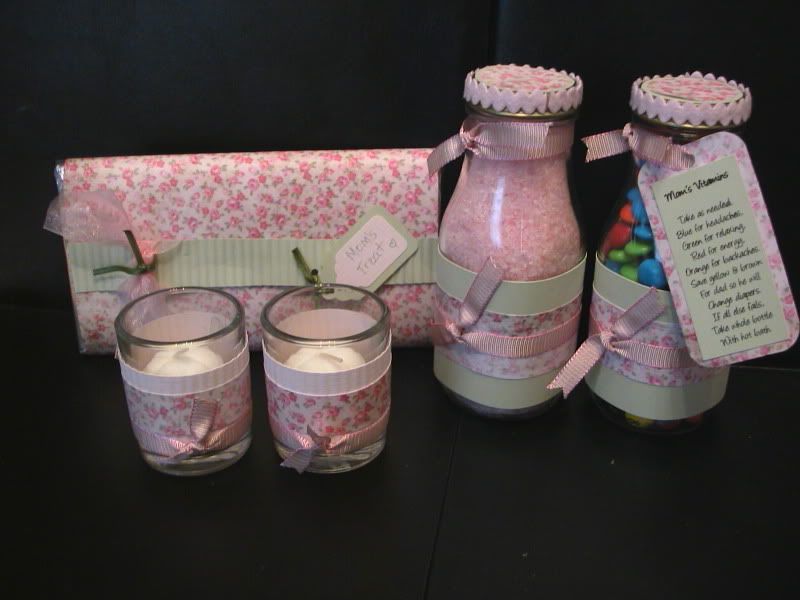
And this final picture is a few things I made for mom - she deserves a little treat too! The two bottles are Starbucks Frappuccino bottles (clean of course!) that I decorated. One is filled with homemade bath salts, and the other is filled with M&M's disguised as "Mom's Vitamins". I decorated the little votive holders and added some votive candles. And the final treat is a large Hershey bar - she's going to need her energy!


The "Vitamin" directions read:
Take as needed.
Blue for headaches, Green for relaxing,
Red for energy, Orange for backaches.
Save yellow & brown for Dad
so he will change diapers.
If all else fails,
Take whole bottle with hot bath.